Post by lilmenchi on Nov 10, 2012 17:25:42 GMT 9.5
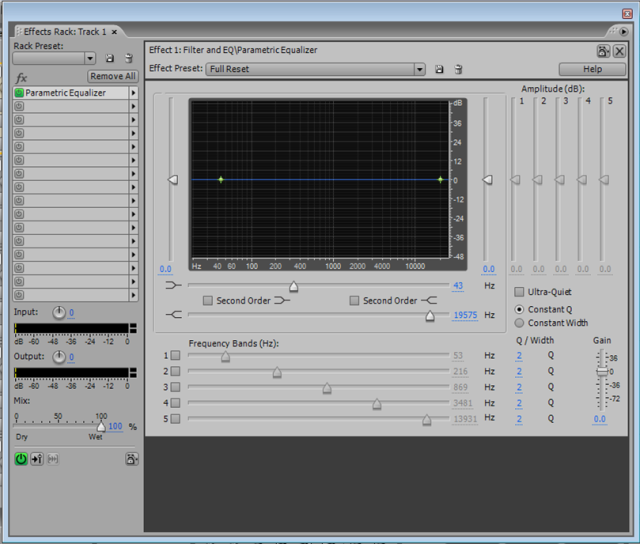
First off, the EQ I'm explaining is using the interface from Adobe Audition 1.5/3.0 and Cool Edit Pro. 2.0. They're all essentially the same with minor differences because they were developed by the same company. I have never touched Audacity's EQ so I won't add that on here, but the theory behind it should still be the same. To start with I'll be explaining the parametric EQ!

There are three main parts to using Parametric EQ; the frequency band you want to boost or cut, the Q and the amplitude in (dB). You use these three variables to control what is edited and by how much. Before I go into that though, you're probably wondering why we use EQ. EQ is used to edit audio by making specified frequencies louder or quieter, it can bring out qualities in a sound that we like or to get rid of qualities we don't. In our case for online karaoke mixing, we can use it to make mics sound clearer and edit vocals to compensate for the quality of the mic or the environment it was recorded in.
The first part I'll talk about is the frequency band section. To use it, first check the numbered box next to the slider to enable it, it will also enable the same numbered slider in the amplitude section. By clicking on the slider and dragging you can change the centre frequency that is being boosted, in the amplitude section, if it's at 0 like in the picture above, set the amplitude to about 5dB, so you can see what is happening. As you move the slider along there is a curve on the graph to show you visually which frequency you are boosting and by how much. The next thing you can change about the way EQ works is by changing the amplitude. As you've probably guessed, with positive amounts it is boosting and with negative it is cutting or lowering the volume. Finally the last thing to explain is the Q. The Q determines the width of the curve, the higher the Q the smaller/narrower the curve will be.
So now you know all the parts, how do you use them? Good question. Mostly it's up to you and what you think sounds good to you, what EQ does will vary depending on each voice and each mic, as they have their own individual frequency response, so what works in one situation might not work in another. However I can give you some general tips that should help. ;D
1. If you have a dull sounding mic, you can brighten it up by boosting the high frequencies.
2. Puffs through a recording and you can't get a redo? You can make them a lot less noticeable by using the *hi-pass filter.
3. Make sure to listen to the original file to make comparisons often, you can do this easily by pressing the green power button next to the effect in the rack on AA3, or by unchecking the number next to the slider.
4. ?
I'll add more as I think of them, let me know if there are any here you want to add ;D
Feel free to ask me any questions you have about anything I've mentioned here. I tried to make this as easy to understand as I could, but if there's something that needs clarifying or there's something I should add, let me know!
*Hi-pass/lo-pass filters; these work by cutting high or low frequencies. A lo-pass filter cuts the high frequencies and 'passes' the low ones, hence 'lo-pass'. These look different to the parametric EQ since they don't have the same curve, this is because they are 'Shelf-type' EQ, not Parametric.
